Showing posts with label Crafts. Show all posts

Friday, December 18, 2015

Crafts: Crochet Brim Hat

My crochet mentor introduced me to a pretty useful site with lots of free patterns (crochet, knitting, etc). It is Ravelry[1]. All you need to do to be able to download their patterns is to register/sign up an account with them. Signing up for an account is free as well ;)

This brim hat[2] is one of the free patterns which I downloaded from Ravelry :) I managed to finish within one night. Hence, I feel that this is a pretty easy pattern to follow. On top of that, it requires only a few materials - Just yarn, hook, stitch marker and darning needle.

I would consider this a good project for beginners. It would be even better if this project motivated a beginner to learn how to crochet the magic loop. That I feel is a pretty useful crochet skill.

Here is the model QW looking pleased with her new hat ;)
Front view
Side view

Initially, I had wanted a fancier border. Hence, I ended the project off with scallop/shell border:
But, I quickly reverted back to following the pattern as I faced a problem with this pattern. Without fabric stiffener, the brim droops down because this border was too heavy. Hence, I redid the the border and ended off with reverse stitch border as suggested by the pattern.

To end off this blog post, I would like to share a silly mistake which I made for this project :P *Haha~* Well, here it goes:

The pattern called for 4 mm crochet hook. And so, I picked up a hook with a big "4" and crocheted happily. After I crocheted the body and band, I paused as I wanted to see if it fits my model ;)

Well, that is when I realised that... the hat is TOO tiny!!! *LOL!* Take a look:

Do join me in laughing at this silly mistake which I had made!! *HAHAHA*

Wondering what went wrong, I finally took a good look at my crochet hook and saw this:

Have you realised what I finally figured out back then?
No? Take a look at this next photo:

Have you figured out the mistake which I had made? *Lol~*

Yes!!! I took the wrong sized hook *Hahaha!!!*
The "4" was a 2.50 mm hook!!!
I should have been using the "7" which is the 4 mm hook as suggested by the pattern!!!

Such a funny mistake I made (which cost me 1 more night of re-doing this hat)!

Ah well, it was an interesting lesson learnt :) *hah~*

References:
1. Ravelry
2. Ravelry - Ruffled Brim Sunhat

Thursday, July 16, 2015

Crafts: Crochet Eloise Baby Sweater

This Eloise Baby Sweater[1][2] was actually done by mid June but I only have time to blog about it now. Here is the finished look:

Yes, I made a matching pants :) I will blog about the pants in another blog post.
No, I did not make that hat. QW's aunt bought it for her :) It is a reindeer hat :) Isn't it cute?

And yes again, I have been making sweaters lately. That is not without a reason. We are bringing QW to New Zealand (NZ) in September!!!

While we are excited to show her the beautiful sceneries in NZ, I am actually quite wary of how cold it may get in September. It would still be Spring in NZ at that time. That means, it will probably be on the cooler, or I should just say colder, side. Hubby did a check and told us the average temperature will be about 11ºC. *Brrrzzzz~~~* *Shivers*

This is not my 1st time going to NZ. Actually, this will be our 3rd time. And I know what NZ is like. Not very cloudy, strong wind, etc. This just means a couple of things:
1. Strong wind means you probably won't feel the heat from the Sun. Having said that, it doesn't mean the Sun is not there. If you are deceived into thinking that cool = no sun, you are going to be sooooo wrong. End result? Sun burnt! and/or wind burnt!
2. Not very cloudy. This meant that the chances of getting sun burnt is high since the clouds which usually block out the Sun is not there~

So, what to do? A ex-colleague who studied her degree in NZ gave the following advices when I was going to visit NZ for the 1st time:
1. Apply sun screen and reapply often depending on its SPF and PA.
2. Apply aloe vera gel. It  is going to be a saviour especially if one really get sun/wind burnt.
3. Moisturiser should do the trick but aloe vera gel would be more calming for the skin.
4. Also, good wind breaker is a big yes yes! Sweater, inner wear, leg warmers, etc. anything to keep warm would be great because the wind is going to make you feel even colder.

Sharing some photos which I took throughout the process:
Skirt
Close-up of the skirt
Yoke completed, sleeves half done
Almost done!

I did follow the pattern pretty closely at the beginning. The main difference from the given pattern was instead of using 4 more colours on the skirt, I used only 2 (gold and purple) on top of the main colour (green).

I deviated from the pattern much more for the yoke area because I feel that the neckline of the original pattern was too low. Also, I spread the buttons further apart because I did not want the sweater to flare outwards too much.

The pattern is pretty beginner friendly, though it can be confusing if you looked at both the website version and downloaded pdf version. I suspect the differences is because one is written based on US crochet language, while the other UK crochet language. Personally, my preference is for the website version. 

This project took lesser time to finish as compared to the puffy baby sweater. It is also lighter than the puffy baby sweater. Perhaps it is because the Eloise baby sweater mainly uses double crochets and single crochets, while the puffy baby sweater has a lot of puff stitches. The puff stitches definitely added a lot of weight and warmth to the sweater. But, it also "consumed" much more yarn than this Eloise sweater.

Well, since this project is done, it's time to proceed to the next project yet again ;)

Wednesday, June 17, 2015

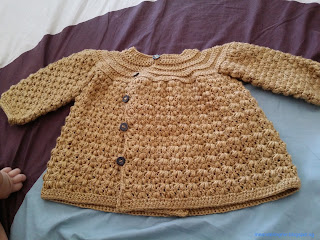
Crafts: Crochet Puffy Baby Sweater

It has been a while since I last blogged. Got a bit caught up with caring for QW because of her recent MMR vaccination shot.

And... also because I was concentrating on getting my 1st crochet sweater completed.

Here are some of the photos I took throughout the process:
When I 1st ran out of yarn
When I next ran out of yarn
Finally completed

I like this puffy baby sweater pattern[1] because the puff looks like heart shape :) I think that it is pretty sweet to have a heart shape pattern on a sweater :)

Before I sew the buttons on, we did a poll among our family members:
Buttons on the york only
Buttons throughout
As you can see, the version whereby she had the brightest smile won. We decided to go ahead with sewing 5 buttons on (even though the other version had more votes >_<)

Many gave feedback that the colour is a bit dull (or not bright enough) for young babies. Well, I think it didn't turn out that badly. At least, this colour probably won't get dirtied easily.

This project took me longer than the handphone pouch. Partly, it was because it was a much bigger scaled project than my 1st project: this one used almost 3 skeins of yarn, while handphone pouch did not even finished 1 skein of yarn.

Another reason was because I miscalculated the amount of yarn required. So, part of the time was "wasted" on going back and forth to purchase the yarns.

Now that this is completed, on with the next project :)

I am really falling in love with crocheting :) Pretty therapeutic~

Reference:
1. YouTube - How to Crochet a Baby Sweater by Anna Phelps

Friday, May 22, 2015

Crafts: My 1st Crochet Project - Handphone Draw String Pouch

I am usually more into origami. Apart from folding using the common material, which is paper, to fold, I have also used other materials such as straw, toilet paper, etc.

Recently, I venture into a new field: Crochet.

My hubby gifted me my crochet materials recently (=
That really helped me to get started on crocheting.

I did very minimal research before making the purchase. I simply did a search and stumbled upon a webpage[1] which suggested that the fundamental crochet start kits are:
  1. Crochet hooks
  2. Scissors
  3. Darning needle
  4. Yarn
The reason behind my being able to do minimal research is because I have a dear friend cum ex-colleague, Marianne Tay-Eng. She has been crocheting for at least 10 years now. So, her advice is definitely useful.

Per her recommendation, I bought a set of crochet hooks that comes packed nicely in a pouch with a scissors, short ruler and 2 darning needles.

So far, I have completed my 1st project, which is a crochet handphone pouch with crochet buttons. After using the crochet hooks for this project, I must say that they are very comfortable to use. Ergonomic would be the best word to describe it. 

My sister confirmed my feelings about the crochet hooks when she commented that her hands were less strained using my crochet hooks (as opposed to hers that she got from Daiso). FYI, this is not a sponsored post and is purely based on my personal experience.

My project is a combination of 3 youtube video tutorials: For instructions on
  1. crocheting simple handphone case (but I used one colour only)[2],
  2. drawstrings and drawstrings holes[3], 
  3. crochet button as decorative for the draw strings[4].
On the hindsight after completing my 1st project, I feel it might be good to have stitch marker. I will probably improvise and use any safety pins as stitch marker instead of buying those specially made for crochet purpose. 

Also, if I were able to make the choice again, I will choose to start with a light colour yarn. Basically, any yarn colour that makes it easy to see where the chains and stitches are. My 1st yarn was of navy colour *sigh*. My eyes hurt so much because I can't make up where the stitches are since it is so DARK *sigh* Definitely not beginner friendly!
Left over yarn wound on remote control

So my personal advice for crochet newbies like me: 
  1. Get an ergonomic crochet hook
  2. Get a yarn in lighter colour
  3. Watch YouTube tutorials (on how to hold crochet hook, yarn, etc.)
  4. Source for projects to practise, practise and practise~
Now, back to my next project: a puffy jacket for QW (=

References:

Saturday, March 14, 2015

Craft: Folding a Letter into an Origami Shirt

Handwritten letters are (I think) quite a rarity nowadays. At least for my case, I probably will leave that for special occasions. In this case, I planned to write one for him in commemoration of our ROM anniversary.

Typically after we have written/typed letters (quite rare these days!), we just fold it into halves, thirds or quarters and stuff them into envelopes.

I feel that the typical way of folding a letter is quite boring. Especially more so if the letter is written for a special occasion~

So, what did I do to make it a little more interesting? I married my love for origami with letter folding ;) Hence, I googled for some ideas and decided to fold my letter into a manly origami shirt. It doubled up as a card as well :)

This is where I will write my "essay" to him :)
Difficulty level is (I feel) probably easy to medium. What I like about folding this origami shirt is it does not take long to make one.

I left the YouTube links on how to make the shirt and necktie under below references. For my case, I did not go with the necktie idea. Instead, I drew buttons and pockets on the origami shirt itself. Pardon my ugly drawing.


There you go~ This is just one of the many quick and easy ways to spice things up a little. You can also make an Origami Heart, Origami Aeroplane, etc. Basically, anything that opens up quite quickly.

Hope this helps to make your card a little more interesting/unique =) 

References: 

Wednesday, December 10, 2014

Crafts: Efficient Gift Wrapping Technique

Every now and then, we may have an occasion that calls for us to wrap a gift or two. I happened to stumble upon friend's posts on efficient gift wrapping techniques which I found interesting.

I am sharing the gift wrapping techniques in the below reference links which are not only efficient in terms of the amount of wrapping paper used, but also the amount of scotch tape used! By the way, I have arranged them in increasing order of the amount of scotch tape used (Haa~!) The 1st link used only ONE scotch tape to wrap the gift! Amazing right?!

By saying that it is efficient in terms of the amount of wrapping paper used does not mean that you can use an overly small sized wrapping paper. From the YouTube videos, I gathered that the bare minimum you need should at least cover the corners of the gift you are wrapping when you attempt to wrap it up diagonally.

Well, efficient in terms of the amount of resources used also meant that it is cost saving (and saving the Earth;)! So, do take a look and try them out of you are going to be wrapping some gifts not just for the efficiency, because they also look presentable!

Hope you find them useful! Do share if you also have a different and efficient way of wrapping gifts :)

References:
  1. YouTube - Japanese department style gift wrapping
  2. YouTube - Gift wrapping in Japan
  3. YouTube - Diagonal gift wrapping technique

Tuesday, December 2, 2014

Crafts: Straw Heart Shape

Do you have those moments whereby you want to pamper your significant other half with handmade gifts? There are many handmade stuff which you can make for such occasions. Most common would be anything in the shape of a heart, for example paper heart[1], straw heart[2], etc. Both are branches of origami: paper origami and straw origami respectively.
Straw heart
Decided to try my hands at both paper heart and straw heart. Materials required are cheap and easy to get: 2 straws for straw heart; a piece of paper for paper heart.

I do not have red or pink coloured straws or paper at home. Hence, the final product in white as shown above. You can choose to make them using red or pink coloured straws or paper to create the loving atmosphere.

By the way, I did not follow the YouTube closely (especially towards the end). Because I intended to use it as a bookmark, I left one strand of straw uncut.

References:
  1. YouTube - Paper heart
  2. YouTube - Straw heart

Thursday, November 20, 2014

Crafts: Toilet Paper Origami

One of my hobbies is origami (折り紙) or Japanese art of paper folding. Hence when the Toilet Paper Origami (TPO) popped up in my Facebook News Feed, it caught my attention immediately.

Have you ever notice the toilet papers in hotels' rest rooms? Many upscale hotels have janitors who fold the toilet papers after cleaning. Hence, seeing such TPO reminded me of my hotel stays. That in turn gives me the feeling of being on a vacation/staycation.

I tried my hands at some of them:

Classical triangle fold
Pleat fold
Origami leaf
Origami tree
Origami bird
I guess if I want to recreate the feeling of being on vacation/staycation while enjoying the comfort of my home, I will fold a TPO ;)

By the way, it seems like the TPO diagrams are arranged in difficulty level: ranging from basic folds such as the Classic Triangle Fold (about 2 to 3 steps), to more complicated folds such as the Origami Bird (more than 10 steps).

Each fold would probably take you no more than 10 minutes (assuming that you have some experience with origami). Oh~ with Christmas just around the corner, you might want to consider folding the TPO tree to add a festive touch ;) So, do give them a try!

Reference:
  1. Origami Resource Center - Toilet Paper Origami 
Related Posts Plugin for WordPress, Blogger...